怎么在Windows 11中安装Hyper-V?Hyper-V虚拟机安装教程
Microsoft Hyper-V 是一种管理程序软件,作为 Windows 原生的 Hyper-V 非常适合您的Windows 11 操作系统。可让您在计算机上创建和运行虚拟机。下面小编带给你最详细的Hyper-V虚拟机安装教程。
Hyper-V 硬件要求
正如您可能预期的那样,在 Windows 11 中启用和运行 Hyper-V 也需要最低硬件规格。看看下面的列表并发现它们:
具有二级地址转换 (SLAT) 的 64 位处理器 – SLAT 代表 Hyper-V 在被要求检索数据或指令时使用的技术。换句话说,它将虚拟地址转换为相应的物理地址,从而节省内存并减少 CPU 时间。
VM 监控模式扩展
至少 4 GB 的 RAM——当然,更多的内存会导致更好的运行。
在 BIOS(基本输入/输出系统)或 UEFI(统一可扩展固件接口)中 打开虚拟化支持
其中一些方面与官方 Windows 11 规范一致,因此请务必检查它们以构建完整的相关透视图。
如何在 Windows 11 中安装 Hyper-V?
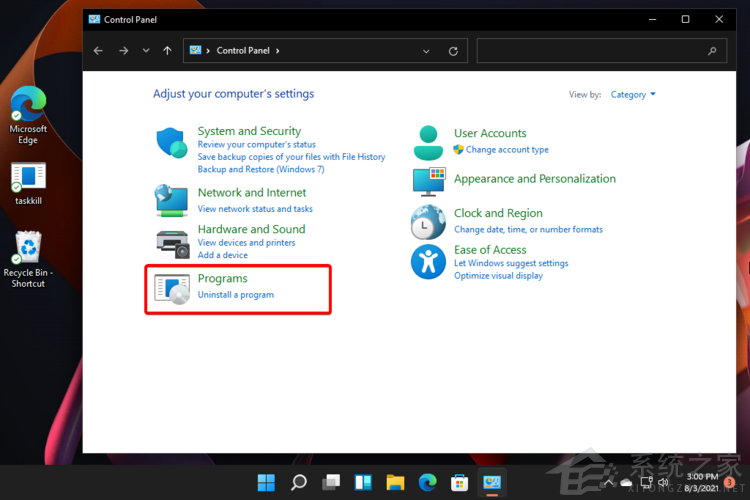
1.、使用控制面板
点击Windows key,然后输入控制面板,然后打开它。

2、点击程序。
3、选择打开或关闭 Windows 功能

4、勾选Hyper-V的选项。

5、展开它,然后确保选中两个选项(如果由于某种原因无法选择第二个选项,如下图所示,您很可能需要在 BIOS 中启用硬件虚拟化)。

6、单击“确定”。
7、您必须重新启动PC,因此请单击“立即重新启动”按钮。
8、按Windows key,单击所有应用程序。

9、查找Windows Tools,然后选择它。
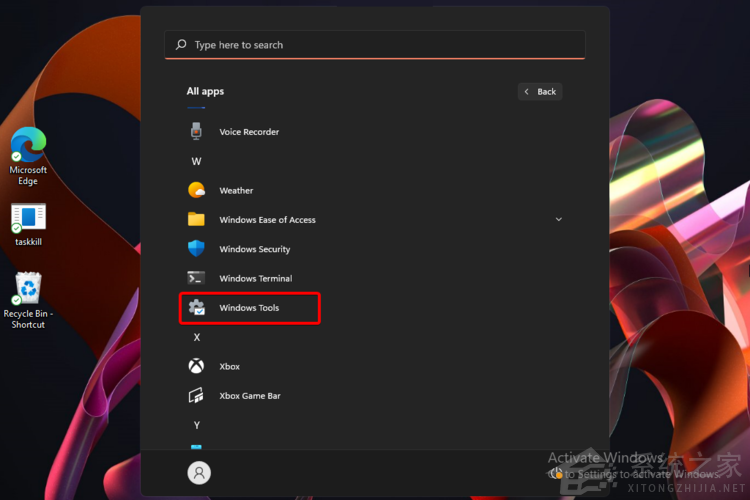
10、搜索Hyper-V Manager,然后双击它。

11、现在,您将能够根据需要使用虚拟机。

2、使用命令提示符
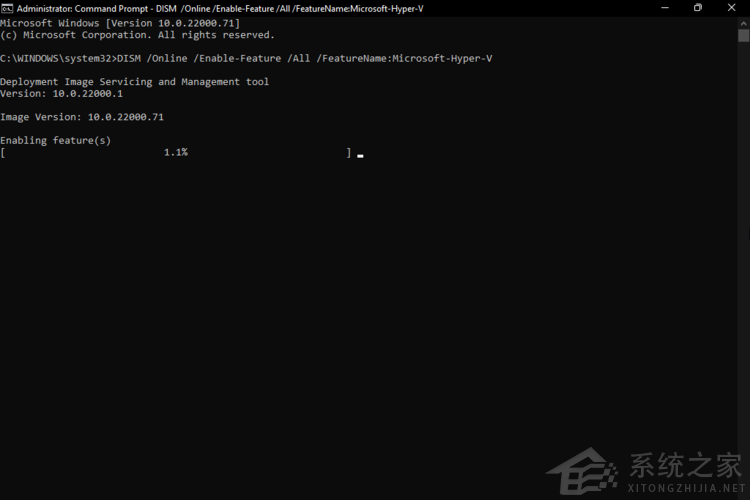
1、点击Windows key,然后输入cmd,然后选择以管理员身份运行。

2、键入以下命令,然后按Enter 键:DISM /Online /Enable-Feature /All /FeatureName:Microsoft-Hyper-V
3、该过程将开始启用Hyper-V 功能,其状态将显示在命令提示符屏幕中。
4、操作成功完成后,系统将要求您重新启动 Windows。要做到这一点,只需按Y键。

5、在你的电脑之后,你会发现Hyper-V已经启用并且可以访问了。
3、使用 PowerShell
1、点击Windows key,然后键入PowerShell,右键单击它,然后选择以管理员身份运行。

2、键入以下命令,然后按Enter 键:Enable-WindowsOptionalFeature -Online -FeatureName Microsoft-Hyper-V -All
3、您的操作系统将重新启动该过程以启用 Hyper-V 功能。

4、启用 Hyper-V 功能后,系统会要求您重新启动 PC。在命令提示符选项中,按 Y 键即可。
若对以上内容有疑问请联系反馈
文章价值
100
