Win10如何设置护眼模式颜色为绿色
2025-02-05 14:14:16
长时间与电子设备相伴,眼睛承受着前所未有的压力。对于使用Windows10系统电脑的用户而言,开启护眼模式是保护眼睛的重要举措之一,其中绿色被认为对眼睛尤其友好,那么这个颜色我们要如何去设置呢?其实非常简单,一起来看看吧。
设置护眼模式颜色为绿色方法
方法一
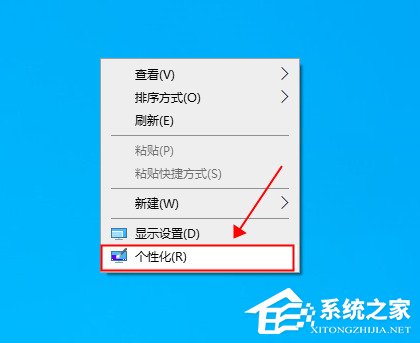
1. 右击桌面空白处,选择选项列表中的“个性化”。
2. 进入到界面之后,需要点击左侧栏中的“颜色”选项。

3. 随后需要点击右侧中的“自定义颜色”按钮。

4. 然后在打开的窗口中,点击右侧中的“更多”选项。

5. 最后对RGP值(199,237,204)进行设置就可以了。

方法二
1. “win+R”快捷键运行窗口,输入“regedit”回车打开。

2. 进入到注册表编辑器界面之后,需要依次点击左侧栏中的“HKEY_CURRENT_USER/Control PanelColors”,找到右侧中的“Window”双击打开,在打开的窗口中,将“数值数据”修改为“199,237,204”。

3. 然后切换到“HKEY_LOCAL_MACHINESOFTWAREMicrosoftWindowsCurrentVersionThemesDefaultColorsStandard”路径中,双击“Window”,在打开的窗口中,将“数值数据”设置为“caeace”,点击确定保存,最后将电脑重新启动就可以了。

以上就是系统之家小编为你带来的关于“Win10如何设置护眼模式颜色为绿色”的全部内容了,希望可以解决你的问题,感谢您的阅读,更多精彩内容请关注系统之家官网。
若对以上内容有疑问请联系反馈
文章价值
100
260人打分
猜你想搜
